CHEESE CLI
CHEESE CLI
Once you install CHEESE you should now have access for a CLI tool for the on-prem users. You can test if the installation is working by running cheese and display the possible commands.
Welcome to CHEESE !
Usage: cheese [options]
Commands:
  configure                    Update CHEESE configuration file
  test                         Test CHEESE commands
  generate-license-key         Generate CHEESE license key
  start-server                 Run CHEESE server (API)
  stop-servers                 Stop all CHEESE servers
  stop-apps                    Stop all CHEESE UIs
  start-app                    Run CHEESE UI
  start                        Run CHEESE server + UI
  embeddings-cpu               Run CHEESE Embeddings computation on CPU
  search                       Run CHEESE Search
  visualize                    Run CHEESE Embeddings visualization
  run-inference                Run CHEESE indexing
  explorer                     Run CHEESE Explorer
  update-scripts               Update CHEESE scripts
  update-env                   Update CHEESE environment file
  update-images                Update CHEESE Docker Images
  update-license               Update CHEESE license file
  download-dbs                 Download CHEESE indexed databases
  extract-dbs                 Extracted downloaded CHEESE indexed databases
  -h, --help                   Show this help message
Updating CHEESE
To get the latest CHEESE version you can run the commands
- cheese update-scripts to get the latest CLI scripts
- cheese update-images to get the latest docker images
Configuring CHEESE
You can update your YAML configuration file defined during the installation using cheese configure
CHEESE license file
- you can run the command
cheese generate-license-keyto generate a license key. Please note that the license key is environment specific, i.e, you will need another license file if you want to run CHEESE on another host machine. - Copy the license key and send it to us. We will provide you with a JSON license file.
- Run
cheese update-licenseand paste the contents of the JSON license file there.
Index Inference
Required for Indexing Custom Database
For users of CHEESE Search wishing to index their own database and search it in the UI, API or CLI, inference step is required. This step is necessary to generate the embeddings and search indexes for the molecules in your database
The CLI tool supports running CHEESE inference on your custom database. You can just run the command cheese run-inference
Usage: cheese run-inference [options]
Options:
  --input_file          Input file in CSV format [REQUIRED]
  --dest                Destination folder [REQUIRED]
  --index_type          Index type : 'clustered', 'in_memory', 'auto' (Default : 'auto')
  --chunk_size          Number of lines of the file to be processed each time (Default : 100000)
  --batch_size          Batch size for CHEESE embeddings computation on GPU (Default : 32)
  --valid_smiles        Whether to check for SMILES string validity (Default : false)
  --canonicalize_smiles  Whether to canonicalize the SMILES string (Default : false)
  --skip_file_headers     Whether to skip the file headers (Default : true)
  --gpu_devices          The IDs of GPU devices to use (Default : 0)
  --clustering_batch_size  The batch size for the clustering (Default : 10000)
  -h, --help       Show this help message
Note : The index type is defined automatically by default. If the input file exceeds 1GB in size, the script will automatically run the clustered inference, otherwise it will run the in_memory inference.
Example
cheese run-inference --input_file test_mols.txt --dest . --index_type in_memory --chunk_size 100 --batch_size 32 --valid_smiles false --canonicalize_smiles false --skip_file_headers true --gpu_devices 0 --clustering_batch_size 1000
Note : By default, the inference will run on CPU !! If you supply the --gpu_devices argument, it will detect GPUs on your machine first, if it doesn't find a GPU device, it will throw an error.
- Clustered indexing mode : requires GPU
- In Memory indexing mode : can run on both CPU and GPU.
Input and Output File Format
In commands that require an input file, the input file should contain lines of molecules in SMILES format and their IDs in the following format : SMILES,id. Here is an example of an input CSV file.
SMILES,id
C[C@H](NC(=O)N1CC2(CCC2)C1c1ccc(F)cc1)C1CC,Z5348285396
CC(NC(=O)N1CC2(CCC2)C1c1ccc(F)cc1)C1CC1,Z5348285396
C[C@@H](NC(=O)N1CC2(CCC2)C1c1ccc(F)cc1)C1CC1,Z5348285396
Supported are as well .smi, .sdf and .txt file formats.
Output files (CHEESE Embeddings) are saved in .npy format. .npy stands for an array in python library NumPy. Our API provides JSON values as well or a CSV (however for more molecules we strongly recommend using the .npy or .parquet formats).
SMILES Standardization
Our tools expect the input SMILES to be in canonicalized rdkit-compatible format, neutralized if possible. In inference there is an optional canonicalization step that can be enabled by the --canonicalize_smiles flag. We recommend standardization function like this (which was used during CHEESE model training). In casual applications the standardization step can be skipped, but it is always better to have the input in a consistent standardized format.
from rdkit import Chem
from rdkit.Chem import rdMolStandardize

def standardize(smiles):
    """
    follows the steps in https://github.com/greglandrum/RSC_OpenScience_Standardization_202104/blob/main/MolStandardize%20pieces.ipynb
    as described **excellently** (by Greg) in https://www.youtube.com/watch?v=eWTApNX8dJQ
    Source: https://bitsilla.com/blog/2021/06/standardizing-a-molecule-using-rdkit/
    """
    mol = Chem.MolFromSmiles(smiles)

    # removeHs, disconnect metal atoms, normalize the molecule, reionize the molecule
    clean_mol = rdMolStandardize.Cleanup(mol)

    # if many fragments, get the "parent" (the actual mol we are interested in)
    parent_clean_mol = rdMolStandardize.FragmentParent(clean_mol)

    # try to neutralize molecule
    uncharger = rdMolStandardize.Uncharger() # annoying, but necessary as no convenience method exists
    uncharged_parent_clean_mol = uncharger.uncharge(parent_clean_mol)

    te = rdMolStandardize.TautomerEnumerator() # idem
    taut_uncharged_parent_clean_mol = te.Canonicalize(uncharged_parent_clean_mol)

    return Chem.MolToSmiles(taut_uncharged_parent_clean_mol)
Starting CHEESE server
To enable the CHEESE functionalities, you need to start a local CHEESE server to perform all functionalities and supplies the available databases to search.
After starting the CHEESE server you can : - Have access to the CHEESE API that you can call using Python, cURL… - Running the CHEESE search app (UI) - Perform CLI commands such as : search, embeddings computation, visualization coordinates…
To start CHEESE server you can just run cheese start-server.
Optionally, you can also specify the port on which to run CHEESE server
Usage: cheese start-server [options]
Options:
  -p, --port      Specify server port (Optional)
  -h, --help       Show this help message
- You can stop all running CHEESE servers using
cheese stop-servers
CHEESE App
-
In case you haven't started the CHEESE server, you can start both the CHEESE server and UI using
cheese start -
In case of an existing running CHEESE server, you can start the CHEESE UI using
cheese start-app -
You can stop all running CHEESE UIs using
cheese stop-apps
Databases
-
If you want to use one of our indexed databases, you can download them via our SFTP file server. Please contact us to set up the file server for you and provide you with access credentials.
-
To download all databases available for your package you can use the command
cheese download-dbs. You'll get the databases in compressed format for faster download.
Usage: cheese download-dbs [options]
Options:
  --dest     Destination folder where to download the databases
  -h, --help       Show this help message
- To extract a particular database you can using the command
cheese extract-dbs
Usage: cheese extract-dbs [options]
Options:
  --dest     Destination folder where databases are downloaded
  --db_name    Database to extract
  -h, --help       Show this help message
- To integrate the downloaded databases to your CHEESE app, please run
cheese configureand modify the configuration file accordingly. An example is below
OUTPUT_DIRECTORIES:
  ENAMINE-REAL: "/data/enamine_real"
  ZINC15: "/data/zinc15"
  MyDatabase: "/data/custom_database_output"

DELIMITERS:
  ENAMINE-REAL: "\t"
  ZINC15: ","
  MyDatabase: ","

INDEX_TYPES:
  ENAMINE-REAL: "clustered"
  ZINC15: "clustered"
  MyDatabase: "in_memory"
Embeddings Computation
CHEESE CLI supports large scale embedding computation on CPU or GPU using CHEESE models by running the command cheese embeddings-cpu or cheese embeddings-gpu. You can supply an input file of molecules, a destination folder to save the embeddings and the search type. You can check the available options by running cheese embeddings-cpu --help
Usage: cheese embeddings-cpu
Computing CHEESE Embeddings on CPU
Options:
  --input_file       Input file in the following formats : .csv , .txt , .smi or .sdf
  --smiles_col       Smiles column in the CSV file (Default SMILES)
  --dest_folder      Destination folder of computed embeddings
  --search_type      Search type : 'morgan', 'espsim_shape','espsim_electrostatic', 'active_pairs','all'
  --port             CHEESE Server port on which to run the computation
  -h, --help         Show this help message
cheese embeddings-cpu --input_file /tmp/cheese_test/test_mols.csv --dest /home/hamzagamouh/embs --search_type morgan
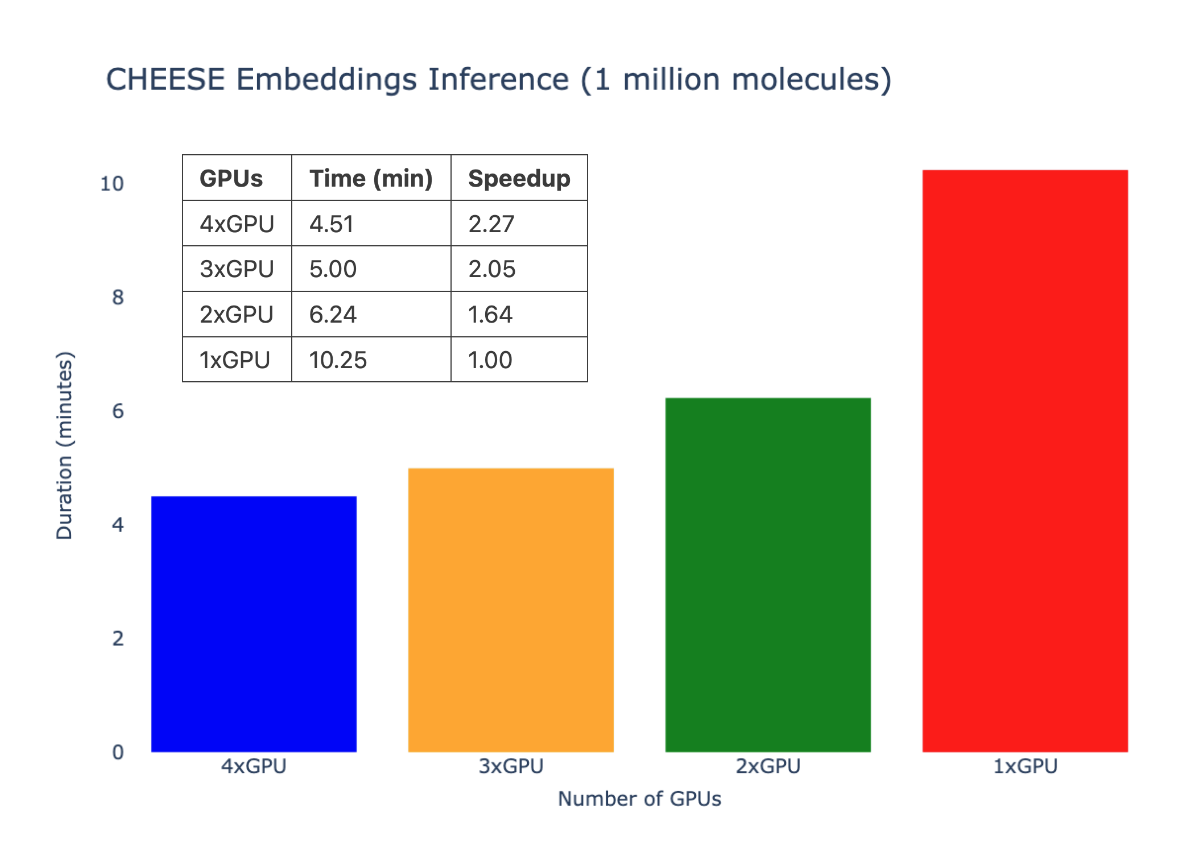
Multi-GPU inference speed
Search
CHEESE CLI supports searching in your available databases by running the command cheese search. You can supply an input file of molecules an output CSV folder to save the search results, together with other search parameters. You can check the available options by running cheese search --help
Usage: cheese search
Searching a file of molecules with CHEESE
Options:
  --input_file       Input file in the following formats : .csv , .txt , .smi
  --smiles_col       Smiles column in the CSV file (Default SMILES)
  --output_file      Destination file of search results
  --search_type    Search type : 'morgan', 'espsim_shape','espsim_electrostatic', 'active_pairs','consensus' (Default : 'morgan')
  --n_neighbors    Number of neighbors
  --search_quality    Speed/Accuracy Tradeoff : 'fast', 'accurate', 'very_accurate'
  --db_names    Names of the databases to search joined by ',' (Default 'ZINC15,ENAMINE-REAL')
  --port             CHEESE Server port on which to run the computation
  -h, --help       Show this help message
Example
cheese search --input_file /tmp/cheese_test/test_mols.csv --output_file /tmp/cheese_test/search_results.csv --db_names CUSTOM_CLUSTERED,CUSTOM_IN_MEM --search_type espsim_electrostatic --search_quality 'very_accurate' --n_neighbors 200
Chemical Space Visualization
CHEESE CLI supports visualizing molecules in 2D by running the command cheese visualize. You can supply an input file of molecules, a destination folder to save the coordinates, together with the visualization method (PCA or UMAP). You can check the available options by running cheese visualize --help
Usage: cheese visualize
Compute CHEESE visualization coordinates for a file of molecules
Options:
  --input_file       Input file in the following formats : .csv , .txt , .smi
  --smiles_col       Smiles column in the CSV file (Default SMILES)
  --dest_folder      Destination folder of compouted coordinates
  --search_type    Search type : 'morgan', 'espsim_shape', 'espsim_electrostatic', 'active_pairs' (Default : 'morgan')
  --visualisation_method    Type of visualisation : 'pca' or 'umap'
  --port             CHEESE Server port on which to run the computation
  -h, --help       Show this help message
Example
cheese visualize --input_file tests/test_mols.csv --dest_folder viz_embs --search_type espsim_electrostatic --visualisation_method pca
Explorer
CHEESE CLI does not only support computing visualization coordinates of molecular CHEESE embeddings, it also provides you with the option of starting the CHEESE explorer app, and navigate your own chemical spaces interactively on your own premises.
The CHEESE Explorer CLI commes with the principal command cheese explorer which has the following options :
Usage: cheese explorer [options]
Options:
  start-app   Start explorer app using the current configuration
  stop-apps   Stop all explorer apps
  configure   Configure explorer app using a YAML configuration file
  add-database   Add a new database to the app
  remove-database   Remove a current database from the app
  -h, --help       Show this help message
Configuration
You can configure CHEESE explorer by running cheese explorer configure which :
Opens the configuration file in $HOME/.config/cheese/cheese-explorer-conf.yaml that was defined during the installation and allows you to edit it.
Optional : You can also supply a configuration file by running cheese explorer configure <config_file> . You can find a template here
Structure of the Explorer config file
# Embeddings used for visualisation
TRANSFORMERS:
  espsim: Electrostatic
  shapesim: Shape
  tanimoto: Fingerprint
  active_pairs: Activity

# Low resolution and high resolution setting (configurable using associated button in the UI)
# Lower values are recommended for performance optimization, higher values for quality.
NUM_POINTS:
  LOW: 25000
  HIGH: 100000

# The keys specify the database filename, values are customizable labels in the plot.
DEFAULT_DATABASES:
  "zinc22": "ZINC22"
  "chembl_34": "ChEMBL 34"
  "eXplore_diverse_2024": "eXplore Diverse 2024"
  "chemriya": "CHEMRIYA 1.2"
  "pubchem_2024": "PubChem 2024"
  "drugbank_5": "DrugBank 5"


# Properties which are computed for the molecules and possible to visualise
MOLECULAR_PROPERTIES:
  - "MolecularWeight"
  - "NumLipinskiHBD"
  - "NumLipinskiHBA"
  - "TotalPolarSurfaceArea"
  - "NumRotatableBonds"
  - "FractionCSP3"
  - "NumAromaticRings"
  - "LogP"
NUM_POINTS - Allowed values are in [1000, 10000, 25000, 50000, 100000]
DEFAULT_DATABASES - All available databases you can select from are here:
DEFAULT_DATABASES:
  "chembl_34": "ChEMBL 34"
  "drugbank_5": "DrugBank 5"
  "eXplore_diverse_2024": "eXplore Diverse 2024"
  "chemriya": "CHEMRIYA 1.2"
  "GDB17": "GDB17"
  "pubchem_2024": "PubChem 2024"
  "SureChEMBL_2024": "SureChEMBL 2024"
  "zinc22": "ZINC22"
  "chebi": "ChEBI"
  "coconut": "COCONUT"
  "foodb_2024": "FooDB"
  "lotus": "LOTUS 2021"
  "synple4": "Synple Chem 4"
  "mcule": "Mcule 2024"
Custom Databases - After adding a new database (see the section below) you can customize the name of the database in the config
Adding a new database
You can add a new database from a CSV input file to the CHEESE explorer by running cheese explorer add-database which comes with the following options.
Usage: cheese explorer add-database [options]
Options:
  --input_file     Input file in CSV format where SMILES column must be 'SMILES'
  --db_name        Name of your database [Default : 'MY_DB']
  -h, --help       Show this help message
Please note that you should have a CHEESE server running before adding a new database, since it allows for computing visualization coordinates. If not, please run cheese start-server
Removing an existing database
You can remove a database from the CHEESE explorer by running cheese explorer remove-database which comes with the following options.
Usage: cheese explorer remove-database [options]
Options:
  --db_name        Name of your database [Default : 'MY_DB']
  -h, --help       Show this help message
Starting the explorer app
You can run the explorer app using cheese explorer start-app which runs the app using the current explorer configuration file, and comes with the following options :
Usage: cheese explorer start-app [options]
Options:
  --port      Specify app port (Optional)
  -h, --help       Show this help message
Killing all explorer apps
You can stop all your running CHEESE explorer apps using cheese explorer stop-apps.